Well, it has been almost a year since my first and last post. Since then, I returned to the working world. I am very blessed to have one of the best bosses in the world but it was still a huge adjustment for our family. I don't know which is easier. Being a working mom or a stay at home mom. Being at home is hard. Really, very, extremely, painstakingly difficult...... But.... On the other hand, going to work has it's downsides with the added bonus of feeling guilty about not being home. Plus, there's still work do to at home when you have finished your work at... work, but I do bring home a paycheck. Sooo... I'm calling it a draw, and now that discussion can be laid to rest. I am supremely blessed to have been able to spend so long home with my boys. They are all now in school all day and I am very lucky to have a job that offers me the flexibility of taking their vacation time off - And now you're caught up. I am off from work until school begins again and, perhaps, I will be able to get a couple of posts in! Maybe, just maybe, I will be able to get some of my projects done. If that's the case, there's a possibility that all the time I have spent on Pinterest will not have been in vain.
Today I am going to share my new obsession. Freezer paper screen printing. Yes, I love it. It is one of the most rewarding projects I have ever done. Try it. Your family will love you, friends and family will "ooh" and "ahh", strangers will be green with envy. My children are now sporting one of a kind creations made by yours truly.
I promise that two out of three children will be thrilled with your handiwork. The picture above is my "Abbey Road" collection. Michael, the miserable child on the left, is a huge Beatles fan. Yeah, I know, it doesn't show. I have a theory about that. When they wake up in the morning they take a vote on who's going to be a pill for the day. This was Michael's day. (That's my husband in the background, doesn't he look proud and supportive?)
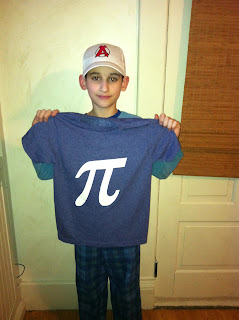
The image on the left is my oldest son with the Pi shirt I made for Pi Day at school. His friends loved it. They all wanted one, they all asked where he got it from!! And then.... they all changed their minds when he told them his mom made it, because in Middle School it's not cool to have anything to do with your mom. The shirts on the right were made for our trip to Colonial Williamsburg. Yup, that's right. I can custom make shirts just for vacation. You know what? I can also forget to put those shirts on them every single day we were there! Yes, that happened. And those shirts mark the end of me printing images out on printer paper, tracing them onto freezer paper and then hand cutting them out because I impulse bought the (drum roll please) Silhouette Cameo! The most amazing thing I own!

All images are for personal use....
So, please don't sue me.
Hoping to go to Disney next, and I'm hoping to REMEMBER to put these shirts out for them to wear! This shirt was inspired by being too broke to shell out tons of cash for shirts when we went to the Disney Store in Time Square.
And now is where I start getting fancy.

Yup, it glows in the dark.
See the bottle of Tulip brand fabric paint? I buy the 'soft' variety. I used the 'slick' version on the George Washington shirts and I very much prefer the 'soft.
OK! Now gather supplies!
Do you see the nasty white plastic table cloth? There's a reason for that. I don't want paint on my beautiful dining room table.
So, first you cut out your image. I use the Silhouette with the cutting depth setting on 1, speed at 3 and thickness setting is 14. I flip the image horizontally because I put the freezer paper shiny side up on the cutting mat. I have heard this gives a cleaner cut. Then, carefully remove image from cutting mat and iron image (shiny side down) onto shirt.
 |
| The hardest part of the project is peeling the image from the cutting mat. |
 Next, you need to slide a piece of card stock or wax paper inside the shirt, so the paint does not bleed through to the other side. And now, we paint. I do three coats and try to wait a half hour between coats. The black paint seems to dry faster than the colors. (I've found that dry time has many variables- fabric of the shirt, temperature in the house, consistency of the paint, etc.) On the first shirts I made I used a sponge brush but I find that a flat children's paint brush works best.
Peeling the freezer paper off the shirt is the most stressful, yet the best part of the whole project. Please wait until it is completely dry. If it's still tacky, you can pull off pieces of your image.
These shirts were all special requests. Right now, I am so enjoying the outcome, that I'm loving the requests! I am sure that won't last.
Now wear your shirts and enjoy the reaction of all those around you when they find out you made them!


